Disk Images Revisited

There are some issues under Snow Leopard.

In a blog post last year, I gave detailed instructions on Making Mac Disk Images Pretty.  Unfortunately, I have discovered that the most recent version of Mac OS X has some issues of which developers should be aware when using that technique (not that there is any obvious alternative).

I recently upgraded my development system to Mac OS X 10.6 (Snow Leopard).  Apple is fairly aggressive with requirements for its development tools,  and I need to upgrade in order to use the latest iPhone SDK.  Of course, I already had a Snow Leopard partition that I had used for testing, so I knew that our software would work, and I never experienced any previous problems.

When the time came to build an update for one of our products (FreeCell Plus 4.00/4.01), I had a few minor niggles with Xcode 3.2.1 (the latest version), described later, but I got the product built and packaged properly.  Then it was time for testing on our other supported versions of Mac OS X, Tiger (10.4) and Leopard (10.5), and I was surprised to learn that, although the software itself ran flawlessly, the disk images showed no background image when mounted, and the folder size was wrong.  The icons were in the correct locations, relative to the top left corner of the window, so the formatting was not entirely ignored, just effectively ignored.

After some research into the problem, I found the answer in this DropDMG forum thread, where it is stated that Apple has confirmed this as a bug in Snow Leopard.  I moved DropDMG over to my Leopard partition, rebooted to that version of Mac OS X (10.5), and build my packages there.  That solved the problem, and the background images showed in all supported versions of OS X.

Conclusion: In order to have background images appear in disk images on older versions of Mac OS X, you must build the disk image under Leopard or earlier, not Snow Leopard.

Caveats: Sometimes, when opening a prepared disk image under Snow Leopard, there is a blank space on the bottom (probably not coincidentally exactly the same size as the folder toolbar), which does not appear on other versions of Mac OS X.  Also under 10.6, the folder toolbar includes a slider control for quickly changing icon sizes (a.k.a., fouling up your layout).  I have not been able to determine the cause of the former issue (yet) nor the reason for the latter.  (How often does one actually change icon sizes that this is even remotely necessary?)

There were some build issues with Xcode 3.2.1 under Snow Leopard.

As I mentioned, I experienced a couple minor build issues after the upgrade to Xcode 3.2.1, both of which were addressed, albeit with differing degrees of success.

First, the default compiler in the latest version of Xcode is GNU 4.2, which is incompatible with the 10.4 (universal) SDK, and the very first build let me know that.  Faced with a choice, downgrading the compiler to GNU 4.0 versus upgrading to the 10.6 SDK, I chose the latter, which I saw as the path of least resistance (see “Apple is fairly aggressive with requirements for its development tools” above).  Unfortunately, at least for our project, the 10.6 SDK does not function as advertised and, despite properly setting the target OS to 10.4 (and obviously not using any 10.5 or 10.6 features), a product built with the 10.6 SDK will not run under Tiger (period), although it does work under Leopard.  I switched (back) to GNU 4.0 and the 10.4 SDK and all was well.

Second, the latest version of Xcode upgrades its tools (obviously), and one seemingly innocuous change to the linker was to eliminate the need for the “-mlong-branch” compile option for certain object files (generally kernel files, which means primarily for Apple and not so much for the rest of us).  Unfortunately, a warning message was added to that effect, yet Apple did not update its PPC object files accordingly.  As a result, every time one links a universal binary (supporting PPC), the linker throws this warning: “Object file compiled with -mlong-branch which is no longer needed.”  The only permanent solution is to recompile certain (protected) development files oneself, or wait until Apple fixes the problem.

The latter issue is extremely annoying to me, because now I am in the position of either ignoring linker warnings, which I never advise, or spending hours (or days) figuring out how to rebuild a portion of the development tools.  Can you say, “not my job“?  Personally, from my experience of Apple over the last few years, my bet is that this problem will soon be addressed by a campaign to suggest that developers should not continue to be stuck in the past supporting PPC systems.

Does anybody want a piece of that action?

Three Steps to Apple Help, Part 3

Accessing Apple Help from C++ Code (Carbon)

The third/final step in implementing Apple Help is programmatically displaying the main contents or individual topics within your help pages.  This, of course, assumes that you have already created a set of HTML help pages for Apple Help and then indexed and integrated these files into your Xcode project.

Accessing Apple Help from C++ using Carbon is fundamentally simple.  The Apple Help Reference contains only 4 functions (plus one constant enumeration that is no longer used).  There is a little bit of necessary mucking about with bundle references and whatnot that may be unfamiliar to programmers who have not worked with Mac development before, but it is all fairly straightforward.

In order to access Apple Help from the application, you first register your help files using the AHRegisterHelpBook() function.  This only needs to be done once, ideally during program initialization, and we do it something like this:

bool RegisterHelp ( void )
{

    CFBundleRef const bundle = CFBundleGetMainBundle ( );
    if ( !bundle )
        return false;

    CFURLRef const location = CFBundleCopyBundleURL ( bundle );
    if ( !location )
        return false;

    FSRef file;
    if ( !CFURLGetFSRef ( location, &file ) )
    {
        CFRelease ( location );
        return false;
    }

    _Error = AHRegisterHelpBook ( &file );

    CFRelease ( location );

    if ( _Error )
        return false;

    return true;

}

(Additional validity checking and error reporting has been stripped from this sample code for clarity.)

In the above example, most of the code is just to obtain the FSRef (file system reference) of the application bundle from which the help is to be displayed, and it assumes that you want help for the current application.  (Obviously, you could instead pass a reference to any other bundle and access a different help system, but that would be unusual.)

Once the help files are registered, you can display the main help page using the AHGotoPage() function (with default parameters), which we accomplish with a function similar to this:

void ShowHelpContents ( void )
{

    CFBundleRef const bundle = CFBundleGetMainBundle ( );
    if ( !bundle )
        return;

    CFStringRef const key = CFSTR( "CFBundleHelpBookName" );
    CFTypeRef const book =
        CFBundleGetValueForInfoDictionaryKey ( bundle, key );
    if ( !book )
        return;

    CFStringRef const help = (CFStringRef)book;

    _Error = AHGotoPage ( help, NULL, NULL );

}

(Additional validity checking and error reporting has been stripped from this sample code for clarity.)

You can also display a specific help topic by using the AHLookupAnchor() function, for which we use something like this:

void ShowHelpTopic ( CFStringRef topic )
{

    if ( !topic )
        return;

    CFBundleRef const bundle = CFBundleGetMainBundle ( );
    if ( !bundle )
        return;

    CFStringRef const key = CFSTR( "CFBundleHelpBookName" );
    CFTypeRef const book =
        CFBundleGetValueForInfoDictionaryKey ( bundle, key );
    if ( !book )
        return;

    CFStringRef const help = (CFStringRef)book;

    _Error = AHLookupAnchor ( help, topic );

}

(Additional validity checking and error reporting has been stripped from this sample code for clarity.)

In both of these last two examples, the function reads the CFBundleHelpBookName string from the main application bundle and uses that string for the name of the help system, passed as the first parameter to the appropriate Apple Help function.  (You could, of course, hard code this string, but if you were thinking that this is a good idea, shame on you.)

Accessing Apple Help from Objective-C (Cocoa)

If you are using Objective-C and Cocoa, much of the help system handling is done behind the scenes (which is, in part, why some programmers find Objective-C to be objectionable).  If you follow the steps in the previous two posts (Part 1 and Part 2) to insert your Apple Help into a Cocoa project, your main help system will work automatically.

The main help page in a Cocoa application is accessible by the user through the ‘Help->[ApplicationName] Help’ menu option by default.  If you wish to bring up the main page from your Objective-C code, you may need to reference an anchor on that page (see below) or use the Carbon method described above.

To access a specific help topic (anchor) from Objective-C and Cocoa, this is done through the shared NSHelpManager object using the openHelpAnchor:inBook: method.  For example, to open the ‘rules’ topic, you would use the following code:

    NSString *book = [[NSBundle mainBundle]
        objectForInfoDictionaryKey:@"CFBundleHelpBookName"];
    [[NSHelpManager sharedHelpManager]
        openHelpAnchor:@"rules" inBook:book];

The documentation for NSHelpManager is quite clear that all of its functionality is simply a number of wrappers around the functions described in the first section of this post, so you could always use those functions directly, if desired.

There you have it.  At this point, you should know enough to properly implement Apple Help in your Carbon or Cocoa application for Mac OS X.  The process is a little convoluted to suss out from the documentation, so I hope this provides a decent jump start.

Three Steps to Apple Help, Part 2

Adding Help Files to an Xcode Project

The second step in implementing Apple Help is integrating the help files into an Xcode project, so they will be properly added to an application bundle, and generating an Apple Help index file.  This article describes the process continuing from the HTML files generated in the previous blog entry (Part 1).  Be sure to read the comments there, too, where Alexander Halser of Help & Manual describes an alternative (and probably quicker) method of adding the necessary ‘name’ tags.

First, transfer the entire folder containing the HTML help files to your Mac OS X development system (as/if necessary).  [A discussion of how this is done is far below the scope of this article.]  The rest of this article assumes that this folder is named “Help”; rename the folder or adjust the instructions as appropriate.

Next, you will be adding the files to the application bundle.  Open your project in Xcode.  Highlight the ‘Resources’ group, right-click (or Command-click) it, and select ‘Add->Existing Files…’ from the context menu.  Choose the ‘Help’ folder and then click the ‘Add’ button.  In the next dialog box, mark the ‘Copy items into destination group’s folder (if needed)’ check box, select the ‘Create Folder Reference for any added folders’ radio button, and then click the ‘Add’ button.  This will create a folder reference in the project, such that the entire contents of the ‘<Project>/Help’ folder will be added to the bundle as a unit.  In other words, you can add, delete, or change files in that folder from outside Xcode and those changes will be reflected in the build without explicitly adjusting the project file.

If you want to add a localized help file instead (which is not a bad idea, even if translating the help file is not in the immediate plans), the above process is slightly different.  In that case, explicitly copy (or move) the ‘Help’ folder into the appropriate project language folder, such as ‘<Project>/English.lproj’.  Follow the same procedure (‘Add->Existing Files…’), but select the ‘<Project>/English.lproj/Help’ folder, and do not (or, rather, it is unnecessary to) mark the check box, but the radio button is still important.  In this case, you will see that instead of just adding a ‘Help’ subgroup to the ‘Resources’ group, Xcode will automatically add the group as ‘Help/English’ (or whichever language).  Repeat as necessary for additional languages.

Now that the help (HTML) files will be properly copied to your application bundle(s), you need to identify these files as the Apple Help files for the project.  To do this, open the ‘Info.plist’ file for the project, a property list that contains global project settings.  Right-click (or Command-click) and select ‘Add Row’ from the context menu, choosing ‘Help Book directory path’ [or ‘CFBundleHelpBookFolder’].  Edit the value of that row to be “Help”.  Using the same procedure, add a ‘Help Book main page CONTENT attribute’ [or ‘CFBundleHelpBookName’] row, and set its value to the identical string from the “AppleTitle’ meta name (e.g., “Pretty Good Solitaire Help” [sans quotes]).  You can now close Xcode.

Creating an Apple Help Index

In order for a user to be able to search your help file, you must create an Apple Help index file.  The tool you need for this is (the enigmatically named) Help Indexer, which should already be installed on your system in the ‘/Developer/Applications/Utilities’ folder.  (I find it convenient to create an alias to this particular utility in a more accessible location.)

Launch the Help Indexer tool.  On the first execution (and thereafter as necessary), you will want to set the utility preferences (‘Help Indexer->Preferences…’), as they determine the parameters for the Apple Help index (or indices) you will create.  In the ‘Index Style’ panel, clear the ‘Generate Panther-compatible Indices’ checkbox, unless you plan to support Mac OS X 10.3 or earlier.  (At this point, we only support 10.4 [Tiger] and later [Leopard and Snow Leopard].)  I recommend selecting the ‘Errors and warnings’ radio button in the ‘Logging Options’ panel, as including the status messages for large help files simply produces too much noise that could hide any valid warning or error messages.

To actually generate the help index file, once the tool is configured, is quite simple.  Click the ‘Select…’ button, browse to select/highlight the ‘Help’ folder, and click the ‘Open’ button.  Then, click the ‘Create Index’ button, and the process begins.  When finished, review the warning/error messages (if any), and then click ‘Quit’ to close the tool.  (Note that, if you do generate a Panther-compatible index, the messages are shown in a separate tab, and you may get a ‘Warning: [filename].html — Error parsing file.  Check validity of HTML.’ message for each file.  In our experience, we were unable to eliminate these warnings, but the indexing still seemed to work properly on the older systems.)

At this point, you can open Xcode and, if you look into your ‘Help’ group (added above), you will see that a new ‘Help.helpindex’ file has been added (as well as a Panther-compatible ‘Help idx’ file, if selected).  The advantage of adding the folder as a reference group, as noted earlier, is that changes to the folder contents (such as adding the index file) are automatically reflected in the project.  The corresponding disadvantage, however, is that these changes do not necessarily trigger a bundle rebuild, so after making help file changes, you will want to either clean your target (‘Build->Clean’ or Shift-Command-K) or explicitly incorporate the changes by right-clicking (or Control-clicking) on the project group that hold the help files and selecting the ‘Preprocess’ command from the context menu.

Now you have a fully indexed Apple Help system incorporated into your project.  All that remains is to add code to programmatically access the main help content, as well as individual topics, which I will cover in the third installment, so please stay tuned.

Three Steps to Apple Help, Part 1

Building an HTML Help File

The first step in implementing Apple Help is building an HTML help file.  Apple Help is the default help system in Mac OS X, and it is fundamentally a system for displaying HTML 4.01 from an application.  In order to use some (or any) of the features of Apple Help, one must do some minor customization, which is what I intend to describe here.  (The actual writing process is left as an exercise for the reader.)

For an overview of Apple Help, see this Apple Help Programming Guide.

Any decent HTML (or text) editor can be used to produce the necessary help files, but since ours is a help system for a product available on both Mac OS X and Windows, it makes sense to start with a full-featured help editor under Windows.  In our case, we use Help & Manual, which is an excellent and capable product.  (Note that we still choose to use the older H&M 4, since version 5 added the silly ribbon toolbar interface.)

Starting with a help project appropriate for Windows HTML Help (.chm), and with a tool that either works with or exports separate HTML files, there are only a few extra steps required to make an equivalent version for Apple Help.  In H&M, you use the ‘Browser-based Help’ option to write the necessary HTML files (as described later).

The common method of accessing a topic in HTML Help (as well as in the older WinHelp format) is via help context numbers.  Apple Help, on the other hand, uses a named anchor tag for each topic that needs to be accessed directly from an application.  For example, for a topic referenced as ‘contents’, you would add the following HTML tag to the topic:

<a name="contents" />

A similar tag should be added to every desired topic page, each with a unique name.  In H&M, this can be done by using the ‘Insert|Plain HTML Code…’ menu option, or you could edit the HTML directly, of course.  I found it most useful to have the basic tag on the clipboard, paste it onto each page, and then directly edit/add the name portion.

Important Note: Do not use spaces or capital letters for the topic names. Apple Help seems to have trouble finding such tags, so context help and searching may fail.

The next step is to export the separate HTML files (if necessary).  In H&M, this is accomplished by generating ‘Browser-based Help’ (via ‘File|Compile Help File…’ or the toolbar).  First, however, you will want to click ‘Customize Browser-based Help’ and make a few changes to the default options.  On the ‘Layout’ page, select the page layout that puts everything in the same window (i.e., no frames, no scripts).  Next, on the ‘Popup Topics’ page, select ‘HTML encoded topics’, which should remove any Javascript.  Finally, on the ‘HTML Export Options’ page, change the ‘Extension for HTML topic files” to “.html” (from “.htm”).

Once your help files are together, you need to add two custom meta tags to the header of the main help page (the one you want to display when the help is opened generically).  The “AppleTitle” meta tag sets the title of the help file, and the “AppleIcon” meta tag sets the name of the help icon (described below).  For Pretty Good Solitaire Mac Edition, which has all the help files in a ‘Help’ folder, we add the following lines inside the page header (<HEAD>) of our contents page, just after the title (<TITLE></TITLE>):

<meta name="AppleTitle" content="Pretty Good Solitaire Help" />
<meta name="AppleIcon" content="Help/help.png" />

The help icon (‘help.png’, in the above example) should be a 16×16, 32-bit image (with alpha transparency) that represents the help file, usually a small version of the application icon.  Place this image in the same folder with all of the HTML files.  Note that Apple Help in recent versions of OS X do not display the help icon prominently (if at all), but help icons were important in earlier versions.

Finally, in order to appear similar to other Mac applications, you will want to change the fonts in your CSS (you did use CSS, right?) to prefer ‘Geneva’ over ‘Arial’ for the display font.  H&M generates a ‘default.css’ file, so to make this change, you need only replace each instance of “font-family: ‘Arial’;” in this file with “font-family: ‘Geneva’, ‘Arial’;” and you are done.

As a final hint, if you are using Help & Manual, you can provide a link to the keyword index (automatically generated) by manually adding a link similar to the following (for the ‘pgsme’ project):

<a href="pgsme_kwindex.html">Help Index</a>

At this point, you should have a folder containing all of the HTML files for your help system, with the necessary tags, and a help icon file.  Now, just prepare to transfer these files onto your Mac development system and wait for the second installment, in which I will explain how to generate the Apple Help index and add the help files to an Xcode project.

Making Mac Disk Images Pretty

This is how to add that “curb appeal” to your Macintosh disk images.

Important update:  Be sure to read Disk Images Revisited, the quick synopsis of which is that this method does not work properly on Snow Leopard due to a Mac OS X bug.  (Building disk images under Tiger or Leopard works fine.)

In a previous posting, I explained the basics of making Macintosh Disk Images for software distribution. By following that method, using free tools from Apple, you can create a basic disk image (.dmg) file that is suitable for downloading. The only problem is that, when mounted, it appears simply as a plain window with the bundle (and any additional files) in it. Utilitarian, at best.

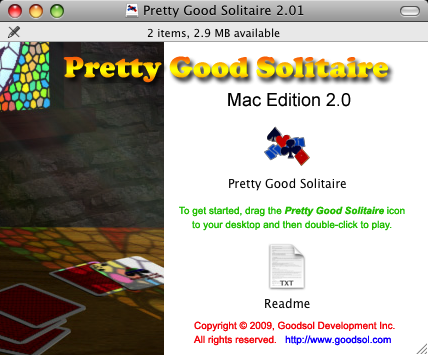
We wanted something more like this:

Pretty Good Solitaire Mac Edition 2.0

This gives a much better initial experience, being not only more visually appealing, but also providing some initial instructions (text in green). Note that the ‘Pretty Good Solitaire’ and ‘Readme’ icons are live, while the rest of the window is simply a background image. In addition to this display when the disk image is mounted, we also wanted to add a license agreement before that happened.

We accomplished what we wanted (the image above being an actual screen capture from our upcoming release), and this is how we did it.

First of all, this can be accomplished, in theory, using the ‘Disk Utility’ and other free tools included with Mac OS X, provided a certain amount of legwork both in figuring out and then in executing the process. Upon a recommendation in the private ASP (Association of Shareware Professionals) newsgroups, however, we tried and settled on an inexpensive third-party tool called DropDMG, from C-Command Software. Not only does this save time and hassle, but it provided an added feature that we did not even know we wanted. (The trial version is fully-featured, and for only $20 the decision to purchase took no deliberation.)

Even with this tool making life easier, it is important to note that the process is slightly convoluted, primarily because one needs a relative path to background image. In our first few attempts, we managed to have backgrounds that showed only on the development system, but disappeared (rather, never appeared) when downloaded to another system. The basic approach is to create a writable disk image first, with the desired contents (including the background image), then arrange this malleable window as desired, and finally convert that into a final (read-only) disk image for distribution.

The first step is to create the desired background image (which is left as an exercise for the reader); it should probably be a non-lossy PNG file for best results. This file should generally be “hidden” in the disk image, and (according to warnings I chose not to test) needs to be in a subfolder, not the root of the disk image. The most common, even ubiquitous, recommendation is to make a hidden subfolder and place the background image in that. However, we took a slightly different tack, by way of the following trick:

Add the background image (say, install.png) to your product bundle in Xcode. Our software has a ‘resources’ folder that contains various images used in the game, and by simply copying the background bitmap there and then adding the file to the project, it is included in the application bundle. This way, there is no messing around with an extra folder just to hold a single file, and if a system is configured to show hidden files, there is not a rogue “.background” folder icon floating around, messing up the layout. (The drawback is that the bundle is slightly larger, but the download size would be essentially the same, and an extra 100K on a hard drive is negligible these days.)

Once you have the background image created and included in your project, follow the setup process in the original post, by creating a distribution folder (named “Pretty Good Solitaire 2.01” in our example) and copying your application bundle and any other files/documentation (e.g., “Readme.txt”) into it. This will serve as the basis of the final disk image, so make sure that everything is up to date.

Now, this is where DropDMG comes into play. Launch this application and create a default configuration for writable disk images (which we, creatively, called “writable”). Select ‘DropDMG->Preferences…’ from the menu, and then in the dialog box, for ‘Format’ choose “.dmg Read-write (can be modified)”. Frankly, the other settings do not matter much here, so leave the default values. Finally, select ‘Save Configuration As…’ (Command-S) from the ‘Configuration’ box and save this configuration, then close the window.

Next, select “writable” (or whatever named you chose) in the ‘Configuration’ box of the ‘DropDMG Status’ window. Then, simply drag the distribution folder onto this window, and a disk image will be created and placed (by default) next to the distribution folder. The log file will reflect this action (as in, Created “Pretty Good Solitaire 2.01.dmg”).

The next step is to mount (and open) the writable disk image, which can be done simply by double-clicking on it in Finder. This window can then be configured as desired, including resizing, setting icon sizes and positions, and (of course) changing the background image. Here are the steps that we take to do this:

  1. Press Command-J (‘Show View Options’).
  2. Under ‘Background’, select the ‘Picture’ radio button.
  3. Click on ‘Select…’ to choose the background image.
  4. Select the mounted disk image (under ‘Devices’).
  5. Press Shift-Command-G (‘Go to Folder…’).
  6. Type the name of the application bundle (e.g., “Pretty Good Solitaire.app”).
  7. Browse ‘Contents’ for background image file (e.g., “resources/install.png”).
  8. Click on ‘Select’ button.
  9. Resize window to fit background image (if necessary).
  10. Reposition icons as desired.

Once you have this done, unmount the disk image, and the layout configuration will be saved. (You can double-click on the .dmg file again to verify this.) Note that it is essential that the background image be selected from the disk image itself (see step #4); otherwise, the link will be to a file on the current system that will (most likely) not be on a user system, and a plain white background will be used instead.

If you want to include a license agreement in the disk image, one that must be accepted before the disk image is mounted, then you will need to add one in DropDMG. Honestly, this part of the interface leaves a little to be desired, but to avoid confusion, here are the basic steps:

  1. Press Command-L to ‘Show [License] Agreements’ window.
  2. Press Command-D to ‘Add [License] Agreement…’ (name).
  3. Type a name for the new license agreement and click ‘Add’.
  4. Select the new license agreement in the window.
  5. Press Shift-Command-D to ‘Add Language…’ to that agreement.
  6. Choose a language and click ‘Add’.
  7. Double-click the added language and insert text as needed.
  8. Repeat previous three steps for each desired language.

At this point, return to DropDMG preferences again (DropDMG->Preferences…). This time, create another configuration for your specific product. Under ‘Format’, select “.dmg zlib-compressed (Mac OS X 10.1)” (or another read-only option at your discretion). This will be the format of the final distributable disk image.

Under ‘Options’, you can select the license agreement added above, if desired. Check the ‘Use custom icon for mounted image’ option. This is the bonus feature that we did not even know enough about to know we wanted. Instead of a simple disk icon, when mounted the disk image shows a disk icon with the bundle icon superimposed on it (which you can see in miniature on the title bar in the example above). There is a way to create a truly custom icon, but we did not feel the need to go that far.

Also check the ‘Auto-open image window after mounting’ option, which causes your window landscaping to immediately appear to the user when the disk image is mounted, as intended. However, do not check the ‘Internet-enable’ option, as this will cause the contents to be automatically copied into the download folder, skipping all of the hard work you just did to get to this point.

Save this configuration (Command-S), close the preferences window, and then select the new configuration in the ‘DropDMG Status’ window. We are in the home stretch now…

Drag the writable (and beautifully landscaped) .dmg file onto the DropDMG window. This will begin a conversion to the new, distributable format. The action will be reflected in the log (as in, Converted to “Pretty Good Solitaire 2.01-1.dmg”). Rename the brand new disk image to something appropriate and upload it. Of course, you definitely need to thoroughly test it, as you would an installer for a Windows product, but if you followed these directions accurately, it should work for you. [Insert disclaimer about me taking no responsibility for your results whatsoever…]

Done.

Macintosh Disk Images

Or… Where Mac OS X really shines over Windows.

On Mac OS X, the preferred installer is none at all. Instead, applications are self-contained bundles that, under the covers, are folder/directory structures that the operating system treats as a single file. Although these entities are analogous to a subdirectory under ‘Program Files’ in Windows, they appear in Finder (the Mac equivalent to Windows Explorer) as a single icon. The bundles should be considered read-only, like the aforementioned Windows folder, and there are known writable areas for user and configuration data.

To “install” a program, a Mac user expects to simply drag the bundle/icon to a location. Done. That’s it. This process is so simple and straightforward that I expect it to be copied by Microsoft at any point. Of course, some applications (think that they) require additional steps and actually use an installer, but short of a major application that touches several areas of the system, like the Xcode Developer Tools, it should be unnecessary.

So, the question becomes: How does one actually distribute applications for Mac OS X? The answer: A publisher provides a downloadable disk image (.dmg) file which contains a complete folder in a single file, readable by any OS X system. When a disk image is opened, it is “mounted” as a new volume with the contents (and name) of the original folder, and from there, the user just drags the application to the desktop (or other folder) or can even just double-click it to run in-situ.

In order to create a disk image, start by creating a distribution folder with the desired name. In our case, with an early version of Pretty Good Solitaire Mac Edition, the folder was named “Pretty Good Solitaire 1.01“. Next, after building a final release version of the application bundle, copy (Alt-drag) it to this folder, along with any other separate files, such as documentation, you want to appear. In our case, for the trial version, we had only the application bundle, named “Pretty Good Solitaire trial[.app]“.

Once the folder is set up as desired, it is time to actually create the disk image file, which is done using the ‘Disk Utility’, which is found in the Utilities folder (Shift-Command-U). Launch this application, and then select ‘File->New->Disk Image from Folder’ from the menu (or Shift-Command-N). Navigate to the folder and press the ‘Image’ button. On the next window, type an appropriate name, make sure that ‘Image Format’ is “compressed” and ‘Encryption’ is “none”, and then press ‘Save’. (We used “pgsme101trial[.dmg]” as a name to eliminate spaces, which are inherently problematic for downloads.) The disk image is then created in the same folder that contains the distribution folder. Quit ‘Disk Utility’.

The disk image is ready to ship, but one can internet-enable the image (by setting a flag) to make it even easier for the user. Normally, when downloaded, a disk image is automatically mounted so the contents can be seen and copied. When internet-enabled, the contents of a disk image are copied to the downloads folder and the disk image itself is unmounted and removed, resulting in just the application in that folder, without the user having to do anything with the image file. An image can be internet-enabled from ‘Terminal’, by navigating to the disk image and typing, “hdiutil internet-enable [filename].dmg“.

This is the basic method for creating a distributable package for Mac OS X. Note that, inexplicably, the Apple Store actually requires ZIP files, so the usual practice is to place the disk image file into a ZIP file, but allowing direct downloads of the DMG file from the product site requires fewer user steps. We have used the above practice for Pretty Good Solitaire Mac Edition 1.0 with success; however, we are modifying it to add “curb appeal” for version 2.0, which will be described later this week.

OT: This weekend produced good NCAA basketball results:
MSU (men) 77, Robert Morris 62.
MSU (women) 60, Middle Tennessee State 59.
MSU (men) 74, USC 69.