
This is how to add that “curb appeal” to your Macintosh disk images.
Important update: Be sure to read Disk Images Revisited, the quick synopsis of which is that this method does not work properly on Snow Leopard due to a Mac OS X bug. (Building disk images under Tiger or Leopard works fine.)
In a previous posting, I explained the basics of making Macintosh Disk Images for software distribution. By following that method, using free tools from Apple, you can create a basic disk image (.dmg) file that is suitable for downloading. The only problem is that, when mounted, it appears simply as a plain window with the bundle (and any additional files) in it. Utilitarian, at best.
We wanted something more like this:
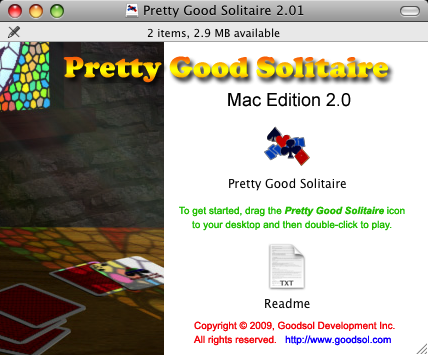
This gives a much better initial experience, being not only more visually appealing, but also providing some initial instructions (text in green). Note that the ‘Pretty Good Solitaire’ and ‘Readme’ icons are live, while the rest of the window is simply a background image. In addition to this display when the disk image is mounted, we also wanted to add a license agreement before that happened.
We accomplished what we wanted (the image above being an actual screen capture from our upcoming release), and this is how we did it.
First of all, this can be accomplished, in theory, using the ‘Disk Utility’ and other free tools included with Mac OS X, provided a certain amount of legwork both in figuring out and then in executing the process. Upon a recommendation in the private ASP (Association of Shareware Professionals) newsgroups, however, we tried and settled on an inexpensive third-party tool called DropDMG, from C-Command Software. Not only does this save time and hassle, but it provided an added feature that we did not even know we wanted. (The trial version is fully-featured, and for only $20 the decision to purchase took no deliberation.)
Even with this tool making life easier, it is important to note that the process is slightly convoluted, primarily because one needs a relative path to background image. In our first few attempts, we managed to have backgrounds that showed only on the development system, but disappeared (rather, never appeared) when downloaded to another system. The basic approach is to create a writable disk image first, with the desired contents (including the background image), then arrange this malleable window as desired, and finally convert that into a final (read-only) disk image for distribution.
The first step is to create the desired background image (which is left as an exercise for the reader); it should probably be a non-lossy PNG file for best results. This file should generally be “hidden” in the disk image, and (according to warnings I chose not to test) needs to be in a subfolder, not the root of the disk image. The most common, even ubiquitous, recommendation is to make a hidden subfolder and place the background image in that. However, we took a slightly different tack, by way of the following trick:
Add the background image (say, install.png) to your product bundle in Xcode. Our software has a ‘resources’ folder that contains various images used in the game, and by simply copying the background bitmap there and then adding the file to the project, it is included in the application bundle. This way, there is no messing around with an extra folder just to hold a single file, and if a system is configured to show hidden files, there is not a rogue “.background” folder icon floating around, messing up the layout. (The drawback is that the bundle is slightly larger, but the download size would be essentially the same, and an extra 100K on a hard drive is negligible these days.)
Once you have the background image created and included in your project, follow the setup process in the original post, by creating a distribution folder (named “Pretty Good Solitaire 2.01” in our example) and copying your application bundle and any other files/documentation (e.g., “Readme.txt”) into it. This will serve as the basis of the final disk image, so make sure that everything is up to date.
Now, this is where DropDMG comes into play. Launch this application and create a default configuration for writable disk images (which we, creatively, called “writable”). Select ‘DropDMG->Preferences…’ from the menu, and then in the dialog box, for ‘Format’ choose “.dmg Read-write (can be modified)”. Frankly, the other settings do not matter much here, so leave the default values. Finally, select ‘Save Configuration As…’ (Command-S) from the ‘Configuration’ box and save this configuration, then close the window.
Next, select “writable” (or whatever named you chose) in the ‘Configuration’ box of the ‘DropDMG Status’ window. Then, simply drag the distribution folder onto this window, and a disk image will be created and placed (by default) next to the distribution folder. The log file will reflect this action (as in, Created “Pretty Good Solitaire 2.01.dmg”).
The next step is to mount (and open) the writable disk image, which can be done simply by double-clicking on it in Finder. This window can then be configured as desired, including resizing, setting icon sizes and positions, and (of course) changing the background image. Here are the steps that we take to do this:
- Press Command-J (‘Show View Options’).
- Under ‘Background’, select the ‘Picture’ radio button.
- Click on ‘Select…’ to choose the background image.
- Select the mounted disk image (under ‘Devices’).
- Press Shift-Command-G (‘Go to Folder…’).
- Type the name of the application bundle (e.g., “Pretty Good Solitaire.app”).
- Browse ‘Contents’ for background image file (e.g., “resources/install.png”).
- Click on ‘Select’ button.
- Resize window to fit background image (if necessary).
- Reposition icons as desired.
Once you have this done, unmount the disk image, and the layout configuration will be saved. (You can double-click on the .dmg file again to verify this.) Note that it is essential that the background image be selected from the disk image itself (see step #4); otherwise, the link will be to a file on the current system that will (most likely) not be on a user system, and a plain white background will be used instead.
If you want to include a license agreement in the disk image, one that must be accepted before the disk image is mounted, then you will need to add one in DropDMG. Honestly, this part of the interface leaves a little to be desired, but to avoid confusion, here are the basic steps:
- Press Command-L to ‘Show [License] Agreements’ window.
- Press Command-D to ‘Add [License] Agreement…’ (name).
- Type a name for the new license agreement and click ‘Add’.
- Select the new license agreement in the window.
- Press Shift-Command-D to ‘Add Language…’ to that agreement.
- Choose a language and click ‘Add’.
- Double-click the added language and insert text as needed.
- Repeat previous three steps for each desired language.
At this point, return to DropDMG preferences again (DropDMG->Preferences…). This time, create another configuration for your specific product. Under ‘Format’, select “.dmg zlib-compressed (Mac OS X 10.1)” (or another read-only option at your discretion). This will be the format of the final distributable disk image.
Under ‘Options’, you can select the license agreement added above, if desired. Check the ‘Use custom icon for mounted image’ option. This is the bonus feature that we did not even know enough about to know we wanted. Instead of a simple disk icon, when mounted the disk image shows a disk icon with the bundle icon superimposed on it (which you can see in miniature on the title bar in the example above). There is a way to create a truly custom icon, but we did not feel the need to go that far.
Also check the ‘Auto-open image window after mounting’ option, which causes your window landscaping to immediately appear to the user when the disk image is mounted, as intended. However, do not check the ‘Internet-enable’ option, as this will cause the contents to be automatically copied into the download folder, skipping all of the hard work you just did to get to this point.
Save this configuration (Command-S), close the preferences window, and then select the new configuration in the ‘DropDMG Status’ window. We are in the home stretch now…
Drag the writable (and beautifully landscaped) .dmg file onto the DropDMG window. This will begin a conversion to the new, distributable format. The action will be reflected in the log (as in, Converted to “Pretty Good Solitaire 2.01-1.dmg”). Rename the brand new disk image to something appropriate and upload it. Of course, you definitely need to thoroughly test it, as you would an installer for a Windows product, but if you followed these directions accurately, it should work for you. [Insert disclaimer about me taking no responsibility for your results whatsoever…]
Done.