Three Steps to Apple Help, Part 1

Building an HTML Help File

The first step in implementing Apple Help is building an HTML help file.  Apple Help is the default help system in Mac OS X, and it is fundamentally a system for displaying HTML 4.01 from an application.  In order to use some (or any) of the features of Apple Help, one must do some minor customization, which is what I intend to describe here.  (The actual writing process is left as an exercise for the reader.)

For an overview of Apple Help, see this Apple Help Programming Guide.

Any decent HTML (or text) editor can be used to produce the necessary help files, but since ours is a help system for a product available on both Mac OS X and Windows, it makes sense to start with a full-featured help editor under Windows.  In our case, we use Help & Manual, which is an excellent and capable product.  (Note that we still choose to use the older H&M 4, since version 5 added the silly ribbon toolbar interface.)

Starting with a help project appropriate for Windows HTML Help (.chm), and with a tool that either works with or exports separate HTML files, there are only a few extra steps required to make an equivalent version for Apple Help.  In H&M, you use the ‘Browser-based Help’ option to write the necessary HTML files (as described later).

The common method of accessing a topic in HTML Help (as well as in the older WinHelp format) is via help context numbers.  Apple Help, on the other hand, uses a named anchor tag for each topic that needs to be accessed directly from an application.  For example, for a topic referenced as ‘contents’, you would add the following HTML tag to the topic:

<a name="contents" />

A similar tag should be added to every desired topic page, each with a unique name.  In H&M, this can be done by using the ‘Insert|Plain HTML Code…’ menu option, or you could edit the HTML directly, of course.  I found it most useful to have the basic tag on the clipboard, paste it onto each page, and then directly edit/add the name portion.

Important Note: Do not use spaces or capital letters for the topic names. Apple Help seems to have trouble finding such tags, so context help and searching may fail.

The next step is to export the separate HTML files (if necessary).  In H&M, this is accomplished by generating ‘Browser-based Help’ (via ‘File|Compile Help File…’ or the toolbar).  First, however, you will want to click ‘Customize Browser-based Help’ and make a few changes to the default options.  On the ‘Layout’ page, select the page layout that puts everything in the same window (i.e., no frames, no scripts).  Next, on the ‘Popup Topics’ page, select ‘HTML encoded topics’, which should remove any Javascript.  Finally, on the ‘HTML Export Options’ page, change the ‘Extension for HTML topic files” to “.html” (from “.htm”).

Once your help files are together, you need to add two custom meta tags to the header of the main help page (the one you want to display when the help is opened generically).  The “AppleTitle” meta tag sets the title of the help file, and the “AppleIcon” meta tag sets the name of the help icon (described below).  For Pretty Good Solitaire Mac Edition, which has all the help files in a ‘Help’ folder, we add the following lines inside the page header (<HEAD>) of our contents page, just after the title (<TITLE></TITLE>):

<meta name="AppleTitle" content="Pretty Good Solitaire Help" />
<meta name="AppleIcon" content="Help/help.png" />

The help icon (‘help.png’, in the above example) should be a 16×16, 32-bit image (with alpha transparency) that represents the help file, usually a small version of the application icon.  Place this image in the same folder with all of the HTML files.  Note that Apple Help in recent versions of OS X do not display the help icon prominently (if at all), but help icons were important in earlier versions.

Finally, in order to appear similar to other Mac applications, you will want to change the fonts in your CSS (you did use CSS, right?) to prefer ‘Geneva’ over ‘Arial’ for the display font.  H&M generates a ‘default.css’ file, so to make this change, you need only replace each instance of “font-family: ‘Arial’;” in this file with “font-family: ‘Geneva’, ‘Arial’;” and you are done.

As a final hint, if you are using Help & Manual, you can provide a link to the keyword index (automatically generated) by manually adding a link similar to the following (for the ‘pgsme’ project):

<a href="pgsme_kwindex.html">Help Index</a>

At this point, you should have a folder containing all of the HTML files for your help system, with the necessary tags, and a help icon file.  Now, just prepare to transfer these files onto your Mac development system and wait for the second installment, in which I will explain how to generate the Apple Help index and add the help files to an Xcode project.

Most Popular Solitaire 2.00

An update to yet another successful card solitaire game is released.

One week ago, Most Popular Solitaire 2.00 was published by Goodsol Development. This is a major upgrade to a product first released (for Windows) in 2003. Most Popular Solitaire is a collection of 30 of the most popular (surprise!) card solitaire games, including all of the favorites: Klondike (often known as simply Solitaire), FreeCell, Spider, and a number of (well, 27, obviously) others.

In terms of features, either the most important or least important, depending on ones system, is that Most Popular Solitaire 2.00 has equivalent versions for both Windows and Mac OS X available. This new version also includes Climb Mode and 13 bonus games in the full (purchased) version, as well as a number of other smaller features. (Of course, everything is a new feature on this initial Mac release, but it is an improvement on Pretty Good Solitaire Mac Edition 1.0, which included the same 30 games.)

In terms of technology, this release used the same revisions of our Goodsol Solitaire Engine that were used for Goodsol Solitaire 101 version 1.01 (on Windows) and Pretty Good Solitaire Mac Edition 2.01 (on Mac OS X). These are the last planned updates before the next GSE upgrade, which will add a few additional features and make some internal changes to reduce the source code differences between platforms.

The marketing challenge for this product is handling both the Windows and Mac OS X versions simultaneously. Having the same price (and registration codes) for both makes it easier, and also allows customers to switch to Mac (you know, or the other way) without having to repurchase. The biggest issue is the different approach to trial versions: whereas the Windows version can be converted into the full version by entry of the registration code, the Mac OS X version has a separate full version download.

In the three weeks since the latest Pretty Good Solitaire Mac Edition update, that product has risen (back) into the top 5 on Most Popular in the Cards & Puzzles category for Apple Downloads, but Most Popular Solitaire (Mac Edition) is now in the top 20 (and climbing) in only a week. Downloads of both products (trial versions) are increasing, but we will have to see how that translates into sales.

In any event, somebody is enjoying our games, and I dig that.

Pretty Good Solitaire Mac Edition 2.01

A update to our best-selling card solitaire game for the Mac is available.

Goodsol Development published Pretty Good Solitaire Mac Edition 2.01, a maintenance update to PGSME 2.0 announced here.

This version of Pretty Good Solitaire Mac Edition fixes about a dozen (i.e., all) bugs reported since the initial release, and also makes a few changes designed to improve ease of use and, thereby, reduce the number of customer support inquiries. In particular, many users did not understand the Climb Mode feature at all, much to my personal dismay, so it is no longer the default.

The most important bug fix in this version, and the one that took the longest time to find and track down, was an interface race condition which could allow code to be unexpectedly reentered, sometimes causing a crash or, more often, just creating illegal positions. The nature of the bug meant that some (most?) players would never experience a problem, but a few managed to trigger the error on a regular basis. Imagine clicking to redeal a waste pile back to the stock and then attempting to redeal from the stock during this process. Unfortunately, “Patience is a Virtue” was not an adequate response.

After the initial release, Pretty Good Solitaire Mac Edition 2.0 was a hit in the Top Apple Downloads, rising to #2 Most Popular in the Cards & Puzzles category (and still in the top 20 as I write this). It also flirted with the Top 5 overall in the general Games category, peaking at around #6. This is only the tip of the iceberg, though, as the upcoming PGSME version 2.1 will have 200 games, up from 101 in the current version.

Onward and upward…

Making Mac Disk Images Pretty

This is how to add that “curb appeal” to your Macintosh disk images.

Important update:  Be sure to read Disk Images Revisited, the quick synopsis of which is that this method does not work properly on Snow Leopard due to a Mac OS X bug.  (Building disk images under Tiger or Leopard works fine.)

In a previous posting, I explained the basics of making Macintosh Disk Images for software distribution. By following that method, using free tools from Apple, you can create a basic disk image (.dmg) file that is suitable for downloading. The only problem is that, when mounted, it appears simply as a plain window with the bundle (and any additional files) in it. Utilitarian, at best.

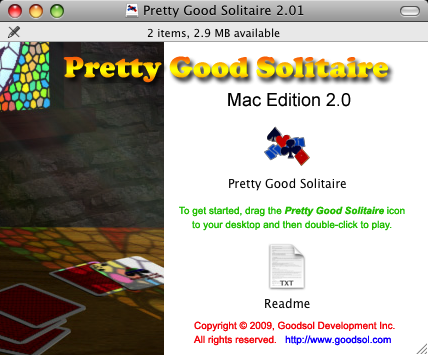
We wanted something more like this:

Pretty Good Solitaire Mac Edition 2.0

This gives a much better initial experience, being not only more visually appealing, but also providing some initial instructions (text in green). Note that the ‘Pretty Good Solitaire’ and ‘Readme’ icons are live, while the rest of the window is simply a background image. In addition to this display when the disk image is mounted, we also wanted to add a license agreement before that happened.

We accomplished what we wanted (the image above being an actual screen capture from our upcoming release), and this is how we did it.

First of all, this can be accomplished, in theory, using the ‘Disk Utility’ and other free tools included with Mac OS X, provided a certain amount of legwork both in figuring out and then in executing the process. Upon a recommendation in the private ASP (Association of Shareware Professionals) newsgroups, however, we tried and settled on an inexpensive third-party tool called DropDMG, from C-Command Software. Not only does this save time and hassle, but it provided an added feature that we did not even know we wanted. (The trial version is fully-featured, and for only $20 the decision to purchase took no deliberation.)

Even with this tool making life easier, it is important to note that the process is slightly convoluted, primarily because one needs a relative path to background image. In our first few attempts, we managed to have backgrounds that showed only on the development system, but disappeared (rather, never appeared) when downloaded to another system. The basic approach is to create a writable disk image first, with the desired contents (including the background image), then arrange this malleable window as desired, and finally convert that into a final (read-only) disk image for distribution.

The first step is to create the desired background image (which is left as an exercise for the reader); it should probably be a non-lossy PNG file for best results. This file should generally be “hidden” in the disk image, and (according to warnings I chose not to test) needs to be in a subfolder, not the root of the disk image. The most common, even ubiquitous, recommendation is to make a hidden subfolder and place the background image in that. However, we took a slightly different tack, by way of the following trick:

Add the background image (say, install.png) to your product bundle in Xcode. Our software has a ‘resources’ folder that contains various images used in the game, and by simply copying the background bitmap there and then adding the file to the project, it is included in the application bundle. This way, there is no messing around with an extra folder just to hold a single file, and if a system is configured to show hidden files, there is not a rogue “.background” folder icon floating around, messing up the layout. (The drawback is that the bundle is slightly larger, but the download size would be essentially the same, and an extra 100K on a hard drive is negligible these days.)

Once you have the background image created and included in your project, follow the setup process in the original post, by creating a distribution folder (named “Pretty Good Solitaire 2.01” in our example) and copying your application bundle and any other files/documentation (e.g., “Readme.txt”) into it. This will serve as the basis of the final disk image, so make sure that everything is up to date.

Now, this is where DropDMG comes into play. Launch this application and create a default configuration for writable disk images (which we, creatively, called “writable”). Select ‘DropDMG->Preferences…’ from the menu, and then in the dialog box, for ‘Format’ choose “.dmg Read-write (can be modified)”. Frankly, the other settings do not matter much here, so leave the default values. Finally, select ‘Save Configuration As…’ (Command-S) from the ‘Configuration’ box and save this configuration, then close the window.

Next, select “writable” (or whatever named you chose) in the ‘Configuration’ box of the ‘DropDMG Status’ window. Then, simply drag the distribution folder onto this window, and a disk image will be created and placed (by default) next to the distribution folder. The log file will reflect this action (as in, Created “Pretty Good Solitaire 2.01.dmg”).

The next step is to mount (and open) the writable disk image, which can be done simply by double-clicking on it in Finder. This window can then be configured as desired, including resizing, setting icon sizes and positions, and (of course) changing the background image. Here are the steps that we take to do this:

  1. Press Command-J (‘Show View Options’).
  2. Under ‘Background’, select the ‘Picture’ radio button.
  3. Click on ‘Select…’ to choose the background image.
  4. Select the mounted disk image (under ‘Devices’).
  5. Press Shift-Command-G (‘Go to Folder…’).
  6. Type the name of the application bundle (e.g., “Pretty Good Solitaire.app”).
  7. Browse ‘Contents’ for background image file (e.g., “resources/install.png”).
  8. Click on ‘Select’ button.
  9. Resize window to fit background image (if necessary).
  10. Reposition icons as desired.

Once you have this done, unmount the disk image, and the layout configuration will be saved. (You can double-click on the .dmg file again to verify this.) Note that it is essential that the background image be selected from the disk image itself (see step #4); otherwise, the link will be to a file on the current system that will (most likely) not be on a user system, and a plain white background will be used instead.

If you want to include a license agreement in the disk image, one that must be accepted before the disk image is mounted, then you will need to add one in DropDMG. Honestly, this part of the interface leaves a little to be desired, but to avoid confusion, here are the basic steps:

  1. Press Command-L to ‘Show [License] Agreements’ window.
  2. Press Command-D to ‘Add [License] Agreement…’ (name).
  3. Type a name for the new license agreement and click ‘Add’.
  4. Select the new license agreement in the window.
  5. Press Shift-Command-D to ‘Add Language…’ to that agreement.
  6. Choose a language and click ‘Add’.
  7. Double-click the added language and insert text as needed.
  8. Repeat previous three steps for each desired language.

At this point, return to DropDMG preferences again (DropDMG->Preferences…). This time, create another configuration for your specific product. Under ‘Format’, select “.dmg zlib-compressed (Mac OS X 10.1)” (or another read-only option at your discretion). This will be the format of the final distributable disk image.

Under ‘Options’, you can select the license agreement added above, if desired. Check the ‘Use custom icon for mounted image’ option. This is the bonus feature that we did not even know enough about to know we wanted. Instead of a simple disk icon, when mounted the disk image shows a disk icon with the bundle icon superimposed on it (which you can see in miniature on the title bar in the example above). There is a way to create a truly custom icon, but we did not feel the need to go that far.

Also check the ‘Auto-open image window after mounting’ option, which causes your window landscaping to immediately appear to the user when the disk image is mounted, as intended. However, do not check the ‘Internet-enable’ option, as this will cause the contents to be automatically copied into the download folder, skipping all of the hard work you just did to get to this point.

Save this configuration (Command-S), close the preferences window, and then select the new configuration in the ‘DropDMG Status’ window. We are in the home stretch now…

Drag the writable (and beautifully landscaped) .dmg file onto the DropDMG window. This will begin a conversion to the new, distributable format. The action will be reflected in the log (as in, Converted to “Pretty Good Solitaire 2.01-1.dmg”). Rename the brand new disk image to something appropriate and upload it. Of course, you definitely need to thoroughly test it, as you would an installer for a Windows product, but if you followed these directions accurately, it should work for you. [Insert disclaimer about me taking no responsibility for your results whatsoever…]

Done.

Pretty Good Solitaire Mac Edition 2.0

The next version of our card solitaire game for Mac OS X is now available.

Pretty Good Solitaire Mac Edition 2.0 has been published by Goodsol Development. This solitaire program includes 101 games (up from 30 in version 1.01), plus 34 bonus variants in the full (purchased) version. It also adds some features, including the introduction of Climb Mode. For more information on the basic features, see the screenshot tour.

This version of Pretty Good Solitaire Mac Edition is a major technological upgrade from the previous versions, now being based on our Goodsol Solitaire Engine, which is a cross-platform, data-driven game engine that has been the focus of our development over the last year or more. Although more improvements are still planned, the basic functionality of this engine has already been proven, and it will allow us to produce upgrades and expansions more quickly and easily.

Climb Mode is a feature where deals for a particular game are played in numerical order, with a fixed set of rules, for a cumulative game score. This feature was implemented originally as a solution to online statistics manipulation, but it has evolved into a good competition, especially in the card solitaire games. With the addition of Climb Mode and the supported 101 games, PGSME 2.0 is the Mac OS X equivalent of Goodsol Solitaire 101 on Windows, and they share online high score tables.

Because of the (overly?) generous upgrade policy, Pretty Good Solitaire Mac Edition 2.0 is free to all customers who purchased PGSME 1.0. If you have not purchased yet (why not?), it is available for $24.95 (plus $7.50 if you want it on CD) here.

One down, two to go! (See the second item in our company goals for 2009.)

Macintosh Disk Images

Or… Where Mac OS X really shines over Windows.

On Mac OS X, the preferred installer is none at all. Instead, applications are self-contained bundles that, under the covers, are folder/directory structures that the operating system treats as a single file. Although these entities are analogous to a subdirectory under ‘Program Files’ in Windows, they appear in Finder (the Mac equivalent to Windows Explorer) as a single icon. The bundles should be considered read-only, like the aforementioned Windows folder, and there are known writable areas for user and configuration data.

To “install” a program, a Mac user expects to simply drag the bundle/icon to a location. Done. That’s it. This process is so simple and straightforward that I expect it to be copied by Microsoft at any point. Of course, some applications (think that they) require additional steps and actually use an installer, but short of a major application that touches several areas of the system, like the Xcode Developer Tools, it should be unnecessary.

So, the question becomes: How does one actually distribute applications for Mac OS X? The answer: A publisher provides a downloadable disk image (.dmg) file which contains a complete folder in a single file, readable by any OS X system. When a disk image is opened, it is “mounted” as a new volume with the contents (and name) of the original folder, and from there, the user just drags the application to the desktop (or other folder) or can even just double-click it to run in-situ.

In order to create a disk image, start by creating a distribution folder with the desired name. In our case, with an early version of Pretty Good Solitaire Mac Edition, the folder was named “Pretty Good Solitaire 1.01“. Next, after building a final release version of the application bundle, copy (Alt-drag) it to this folder, along with any other separate files, such as documentation, you want to appear. In our case, for the trial version, we had only the application bundle, named “Pretty Good Solitaire trial[.app]“.

Once the folder is set up as desired, it is time to actually create the disk image file, which is done using the ‘Disk Utility’, which is found in the Utilities folder (Shift-Command-U). Launch this application, and then select ‘File->New->Disk Image from Folder’ from the menu (or Shift-Command-N). Navigate to the folder and press the ‘Image’ button. On the next window, type an appropriate name, make sure that ‘Image Format’ is “compressed” and ‘Encryption’ is “none”, and then press ‘Save’. (We used “pgsme101trial[.dmg]” as a name to eliminate spaces, which are inherently problematic for downloads.) The disk image is then created in the same folder that contains the distribution folder. Quit ‘Disk Utility’.

The disk image is ready to ship, but one can internet-enable the image (by setting a flag) to make it even easier for the user. Normally, when downloaded, a disk image is automatically mounted so the contents can be seen and copied. When internet-enabled, the contents of a disk image are copied to the downloads folder and the disk image itself is unmounted and removed, resulting in just the application in that folder, without the user having to do anything with the image file. An image can be internet-enabled from ‘Terminal’, by navigating to the disk image and typing, “hdiutil internet-enable [filename].dmg“.

This is the basic method for creating a distributable package for Mac OS X. Note that, inexplicably, the Apple Store actually requires ZIP files, so the usual practice is to place the disk image file into a ZIP file, but allowing direct downloads of the DMG file from the product site requires fewer user steps. We have used the above practice for Pretty Good Solitaire Mac Edition 1.0 with success; however, we are modifying it to add “curb appeal” for version 2.0, which will be described later this week.

OT: This weekend produced good NCAA basketball results:
MSU (men) 77, Robert Morris 62.
MSU (women) 60, Middle Tennessee State 59.
MSU (men) 74, USC 69.

Happy Birthday, Mac!

The Apple Macintosh is 25(ish) today.

On this date back in 1984, Apple Computer “introduced” the Macintosh to the public with its famous “1984” television commercial, aired during the third quarter of Super Bowl XVIII.

Although this 60-second spot, directed by Ridley Scott, only ran once (OK, twice), officially, it is considered an advertising masterpiece and is probably one of the most viewed commercials in history. For more information, see its page on Wikipedia.

You can also watch the commercial itself on YouTube.

The Apple Macintosh was actually introduced on January 24 (two days later), but on Saturday I will be ice racing with MIRA (Michigan Ice Racing Association), so we celebrate earlier. (My car this year, a green Ford Contour, is so fast that a camera could not keep up. Yes, that is really me.)

By the way, in Super Bowl XVIII, the underdog LA Raiders (still sounds wrong) defeated the Washington Redskins by a score of 38-9, so the Mac ad was somewhat more exciting than the game.